Need to haul a kayak but have no roof rack? Here, we'll talk about all the (surprisingly) many ways you can transport a kayak on your roof.
Want to build a kayak rack yourself? We’ve gathered some cool DIY kayak rack plans and examples to help you out.
Contents
show
Sometimes, it’s just better to DIY stuff!
Sure, you could pay top dollar for whatever Thule or Yakima are charging for their kayak roof racks, or spend a small fortune on some expensive kayak stand.
Or, just search the internet for some plans and build your own DIY kayak rack for a fraction of the cost.
Welcome to the ultimate guide to DIYing your own kayak rack. From roof racks to standalone racks to hanging wall racks, we’ve got a DIY solution for you below.
We’ve scoured the internet to find you the best ideas and plans to build your own kayak rack using materials that should be A) affordable and B) available at any hardware store or purchased online.
Yes, it’ll take some skill and know-how to make it work, but if you’ve got the savvy, you’ll save yourself a lot of money making your own kayak rack.
Read on to find out all the best plans and ideas we’ve found to put together your own DIY kayak rack below…
Everything You Need to Know About DIY Kayak Racks
Why DIY Kayak Racks are a Good Option
They cost you less
This is probably the #1 reason people consider DIYing their own kayak rack. Instead of spending $500+ on a kayak rack, you can usually make your own simple one for under $100.
If you really want to get fancy (and have to buy a tool or two), you still won’t spend more than $200 TOPS on the kayak rack.
DIY projects are always a great way to save money (if done right), and they can make it much cheaper to install multiple racks in your home: in your truck bed, on your SUV roof rack, on the garage wall and roof, outside your home, in your cabin, etc.
Custom-fit the kayak rack to your space
Most kayak racks are built to be very much “one size fits all”, not in terms of the kayak they store, but the space they take up in your home. This isn’t a problem if you’ve got a roomy garage or plenty of space in your yard. But what if you’re working with limited space—for example, a garage that’s also your workshop, or a truck with a smaller-than-average bed?
That’s where DIYing comes in handy! You can custom-fit the rack to the space where you’ll be installing it, and it’s the smarter, safer way to customize and personalize the kayak rack rather than adapting an existing, pre-fabricated rack.
Custom-build the rack to hold your watercraft
Typically, kayak racks have no problem storing a variety of kayaks—from recreational to fishing to expedition to whitewater.
However, what if you want a rack that can hold not only kayaks, but also paddleboards, canoes, and even a small fishing boat? You won’t find a “one size fits all” kayak rack that can accommodate such a wide variety of watercraft.
But with a custom-built rack, you can ensure that all of your watercraft can fit in place. You can craft special cradles for the thinner paddleboards, or add heavier and thicker slots for the larger canoes or fishing boats.
You’ve got plenty of options because you’re building it yourself!
Utilize existing materials
It’s pretty common for DIYers to have at least some materials lying around the house—perhaps from another DIY project or home renovation. All of this material can take up space and may remain unused for months or even years until another project comes up.
But a kayak rack is the perfect way to use PVC piping, wood, or metal bars left from a past project. You can clear out space in your garage, shed, or basement while also crafting for yourself a customized, sturdy solution for storing your kayaks.
Drawbacks of DIY Kayak Racks
Higher risk of something going wrong
When you buy a standard kayak rack from a well-known brand, you can trust that the rack has been rigorously tested using materials and processes that adhere to high safety standards. The chance of the rack breaking is slim to none, meaning your kayaks (and everything around them) are as safe as they get.
The same can’t necessarily be said of a DIY kayak rack. If you use flawed, weak, or ineffective materials, or you assemble the rack incorrectly, there is a risk that something will go wrong and the rack will break on you.
Even if you assemble it perfectly, over time, weather and repeated use can wear away at even good-quality materials—for example, rusting metal, rotting wood, or weakening ropes or straps.
You may not have the needed tools
Most of us have at least some tools in our home—the basics needed for daily fix-it jobs, plus a few power tools. But you may not have a huge selection of saws, drill bits, welding tools, and other tools needed for a heavy-duty build. If you don’t have them, you will either have to buy them or find a way to assemble the DIY racks without them.
Don’t get me wrong: I love buying and using power tools as much as the next DIYer. But having to buy a tool will definitely make the DIY kayak rack build a lot less “inexpensive” than you anticipated.
You may not have the needed skills
Most of us DIYers are hobbyists, meaning we enjoy DIY projects and have developed some skills, but we’re definitely not professionals.
There will likely be a number of tasks that are beyond our skillset—for example, complex wood joinery or certain types of metal welding.
Finding a complex plan for an epic DIY kayak rack will be good and all, but if you can’t build it, even the best plan will do you no good.
Tips for Smart DIYing
If you’re going to be DIYing your own kayak rack, here are a few tips you should definitely follow:
Build to your skill level
Know what kind of tools you have, what sort of experience you have, and what you’re capable of, and choose DIY kayak racks that fall within your “skill level”.
It’s always good to stretch and improve your skills, but don’t aim for something so high that you fall flat—or, worse, build a rack that is weak, inefficiently assembled, and ultimately going to break.
Plan it out
Don’t just “wing it”, especially when it comes to more complex racks. Have a plan of assembly and follow it step by step.
Many of the plans below come with full measurements and a list of materials, even telling you how to assemble each piece in a specific order.
Follow that plan properly, and the end result will be a work of art rather than a crumbling mess.
Safety first
Take the proper steps to protect yourself, using safety glasses, proper work clothing and shoes, gloves, and the right protections when using power tools.
Make sure the rack, too, takes the safety of your kayaks in mind. Safety for all involved is absolutely crucial!
Give yourself enough time
Set aside an entire weekend day (or the whole weekend) to build the DIY kayak rack. The last thing you want is to rush the job because you’re stressed or pressured for time.
Take your time, follow each step slowly and thoroughly, and the end product will always come out better.
Measure twice, cut once
That’s an old handyman’s saying, and it means “make sure you’re confident in your measurements before making any cuts”. You can always erase old pencil marks to correct mistakes, but you can’t hide saw lines or un-cut lumber.
Be precise
Take exact measurements down to 1/16 of an inch. The more you aim for “perfectly accurate”, the closer you’ll come to “accurate enough for the job”.
No cut or measurement is ever 100% perfect, but you should strive to be as precise as possible.
Buy extra materials
Always make sure you’ve got extra materials on hand. You’ll likely need them if you make a mistake (which, let’s be honest, most of us will on pretty much every job).
It’s better to return unused materials to the hardware store once the job is done than having to run out mid-assembly to buy something you’re missing.
Remember the weather
Untreated wood and unprotected metal will degrade with regular exposure to the elements. Make sure to properly weather-treat wood, and use protective paint or powder-coating on metal to ensure rust can’t eat away at your kayak rack.
Keep this advice in mind, and you’ve got the recipe for success with your DIY kayak racks!
Plans for DIY Kayak Racks
Below you’ll find plenty of plans and ideas to help you build your own DIY kayak racks. Watch the videos and read the diagrams and material lists carefully to make sure A) you can get what you need, and B) you’ve got the skill needed to assemble everything.
Freestanding Racks
1. Gorgeous Wooden Storage Rack
If you’ve got some serious woodworking skills and want to show them off, this rack by the good folks over at Crafted Workshop will be a must-try:
It’s made using gorgeous cypress boards that are milled down to size, and utilizes joinery processes that require a CNC machine.
Definitely not the most newbie-friendly plan, but the end product is truly gorgeous.
2. Simple Multi-Kayak Storage Rack
Anyone with only limited woodworking skills will definitely want to give this rack designed by Create and Babble a try:
It’s essentially a wooden box without walls, one that requires only basic power tools (saw, drill, etc.) to prepare, and only a steady hand and eye for precision to assemble. But you’ll love that it’s large enough to hold at least four kayaks, or an assembly of kayaks, paddleboards, and canoes.
If you’ve got lots of watercraft to store, this may be a good option for you to try.
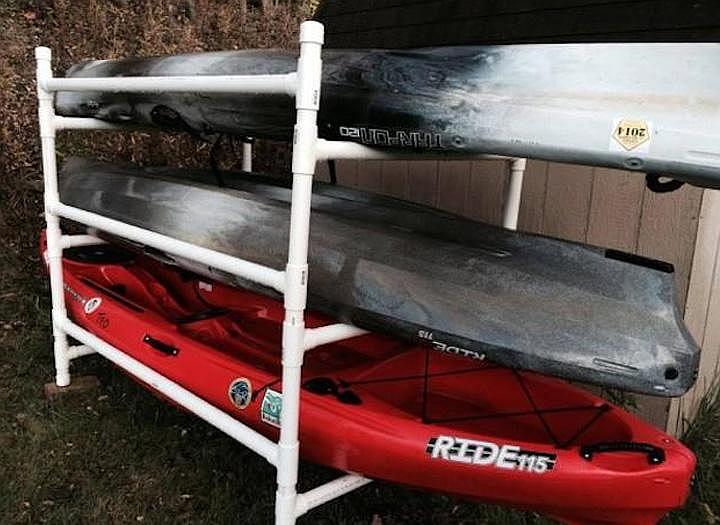
3. 3-Tier Kayak Rack
This kayak rack was posted to Reddit, and the plan is fairly simple: it involves three “shelves” or “tiers”, with space enough to store up to three kayaks or paddleboards.
It’s sturdy enough that you should have no trouble storing your watercraft outdoors or indoors, and the material is the sort of lumber you can find at any hardware store.
What’s great about this particular plan is that there are a ton of pictures that show you how the creator assembled it from start to finish, from the selection of wood to the cuts made to the build process.
This rack plan is perfect for intermediate-level woodworkers who want to craft a multi-level rack capable of storing a few kayaks, paddleboards, and/or canoes.
4. Simple 6-Kayak Storage Rack
If you’ve got a big family and need space to store kayaks for all of you (kids, spouse, etc.), this 6-kayak storage rack posted on Reddit is definitely a good option.
It can hold canoes and paddleboards, too, and the plan is simple enough that it’ll be no great challenge to lengthen the rack for longer kayaks (sea touring/expedition) or shorten it for kids’ or whitewater kayaks (6-8 feet).
In fact, if you build it shorter, it will have no trouble accommodating ultra-short, regular sized, and oversized kayaks. Best of all, it’s a reliable, sturdy, and beautifully simple-to-build kayak rack that shouldn’t cost you more than $100.
5. Scrap Wood Kayak Rack
Got lumber leftover after a DIY project or home renovation? Do what the folks at the TWS YouTube Channel did and build your own kayak rack using scrap wood:
This rack uses chiefly 2x4s, which are the “bread and butter” of most DIY projects, and thus tend to be both fairly inexpensive and available everywhere.
Be aware that this particular video doesn’t show any plans because there were none—the guy just started building and made it work. Better to watch it a couple of times and use the video to draft up your own plans, unless you’ve got skills to match his!
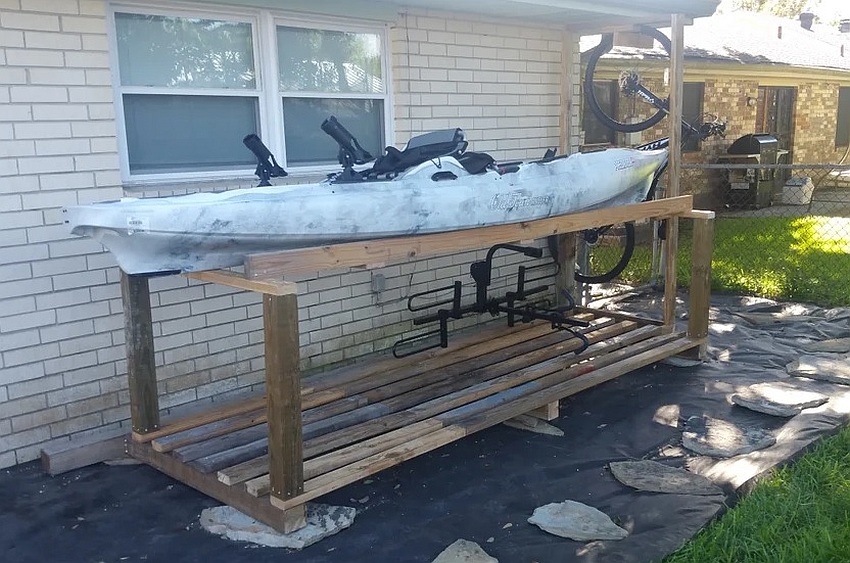
6. Next-Level Kayak Rack
This kayak rack design by RWood Outdoors on YouTube gives you the space for up to four kayaks, but it’s built incredibly sturdy and tough:
You could sell it, use it at a commercial property, or leave it at your lakeside rental cabin trusting that (if the wood is treated properly) it will last for years to come.
It’s not the cheapest DIY kayak rack we’ve found, but it’s absolutely a great option for anyone who wants to build something incredibly durable and long-lasting.
7. Easy DIY Kayak Rack
This DIY kayak rack is designed and built by Alex Barham, and as you’ll see by the YouTube video, it’s a fairly simply one to assemble using materials and tools most DIYers should already have around the house:
The plan can actually be expanded easily to hold up to 14 kayaks, but it’s simple enough that even beginner-level DIYers shouldn’t struggle too much to assemble it.
8. 2-Kayak Holder
Looking for a simple, assembly-friendly kayak rack that you can set outdoors or indoors? This 2-tier kayak holder by April Wilkerson definitely fits the bill:
It factors in space enough to accommodate canoes, too, or can be used to store multiple paddleboards per tier. You can even adapt the design of the rack yourself to add extra storage space on the bottom supports, great for kids’ kayaks or paddleboards.
The video walks you step by step through the entire process, details everything you’ll need, and is great for newbies who are just trying out basic DIY projects.
9. Sturdy Kayak Rack
The good people at My Outdoor Plans have put together a complete list of materials and tools you’ll need to assemble this 2-tier wooden kayak rack.
Newbies will love how detailed these plans are, showing everything from the measurements of your cuts to the angles of the rack arms to the tools you’ll use for each cut.
If you’re not fully confident in your woodworking skills, you’ll definitely want to follow these plans to the letter.
10. PVC Kayak Rack
PVC is an incredibly inexpensive material, but it’s also very lightweight, totally waterproof, and can be very sturdy if assembled correctly.
This PVC kayak rack plan by Wilderness Systems makes it easy to assemble your own rack out of PVC, with materials that will cost you less than $150 and an assembly time of just a few hours:
The best thing about this is that it’s easy to adapt the design to match your kayaks, and with practice, you can even add on more racks even if the rack is already built—you’ll just need more PVC, joints, and glue.
11. Metal and Wood Kayak Rack
This particular rack from A Butterfly House uses simple fence posts (T posts) together with 2×4 lumber to craft a simple but very sturdy rack, one that you dig into the ground. It can handle the weight of heavy kayaks, and you’ll never have to worry about it tipping over once it’s properly assembled.
It’s an inexpensive design that you can build using the sort of materials widely found on most rural and suburban properties.
12. Kayak + Bike Rack
If you’re both a kayaker and a cyclist, this freestanding rack posted on Instructables is a great 2-in-1 design. The top features a simple rack for the kayak, with room to store your bike beneath.
It’s a very sturdy design that requires only a standard tool collection (saws, drills, tape measures, speed squares, etc.) that pretty much every DIYer will have at home. You should have little trouble assembling this rack even if you’re new to DIY projects because the plans are simple and fairly easy to follow.
13. Indoor/Outdoor Storage Rack
This kayak rack posted to Instructables is made using PVC, meaning it’s lightweight enough that you can move it indoors and outdoors any time you want.
During the summer months when you’re using the kayaks regularly, you can set it up in your backyard or on your driveway to keep the kayaks close at hand, then move it into your shed or garage to store the kayaks during the winter months.
It’s a very inexpensive design that is simple to make and will last you for years of regular use. Plus, it even takes into account protecting padding to shield the hulls of your kayaks from damage!
14. Ultra-Sturdy Kayak Rack
This kayak rack designed by the good people at Rustic Crafts is designed to be dug into the ground, using 4×4 posts, which makes it incredibly sturdy and guaranteed to never tip over.
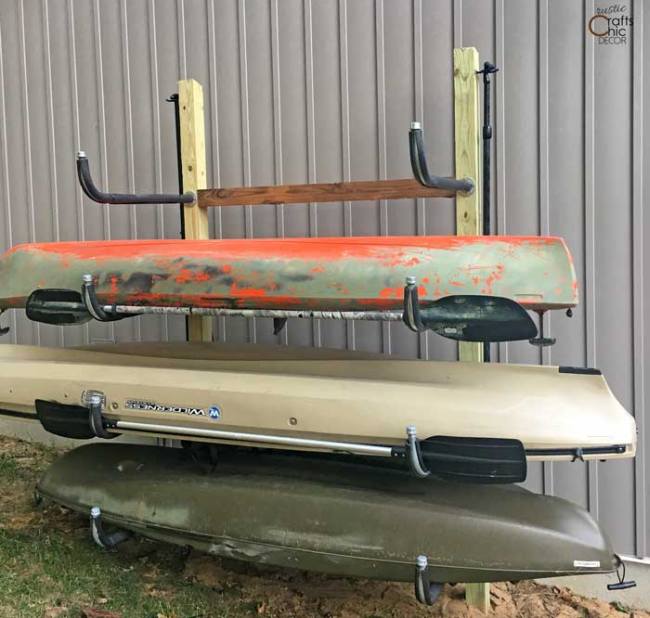
It’s definitely going to take more work than many of the freestanding racks on our list, but it’s worth the effort if you’re going to store multiple heavy kayaks.
The brackets are made using plumbers’ pipe, which is a bit on the pricier side compared to wood but much sturdier and more waterproof. The end-result is a kayak rack that will easily last as long as your home does!
15. HUGE PVC Kayak Rack
If you’ve got multiple kayaks to store (6+), this rack designed by the folks at Sit Ons is a great choice. It uses PVC, so it’s extremely lightweight and can easily be moved around your property, but it’s sturdy enough to accommodate all the kayaks you want to store. Plus, you’ll spend a lot less than you would assembling this rack using lumber.
Car/Truck/SUV Racks
16. Pickup Truck Rack
This rack by Howdy Ya Dewit is designed to fit in the back of your truck bed, perfect for hauling kayaks, canoes, paddleboards, and even lumber and piping.
It’s tough, versatile, and easy to build using pretty standard materials and tools. You’ll likely have to adapt the design of the rack to your pickup truck bed, but that’s easily done by simply lengthening/shortening the boards connecting the two racks.
All you’ll need after that is a few ratchet straps, and you’re good to haul!
17. Easy Peasy SUV Roof Rack
This roof rack by the Wild Wonderful Weekends YouTube channel is a wonderfully easy way to add a rooftop carrier to your SUV:
It will require existing roof rails (though cross-racks aren’t necessary), but it uses inexpensive materials that you can easily order online and modify to whatever vehicle you plan to use to transport your kayaks, canoes, or paddleboards.
Spend less than $100 to make this rooftop kayak rack a reality.
18. Metal Kayak Rack
If you’ve got a bit of welding skill under your belt, this metal rack posted to Instructables is definitely a good option to consider.
It’s incredibly sturdy, waterproof (thanks to the metal used), and capable of withstanding a lot of repeated jolting as you roll down the highway. It’s designed to fit in the back of your truck and offers space enough for multiple kayaks.
You can even customize it to house other gear, including paddles, fishing poles, even your hunting equipment.
19. PVC Roof Rack
For those who’ve already got roof rails and crossbars but don’t want to spend $200+ on Yakima or Thule carriers, these PVC J-cradles are the perfect solution for you.
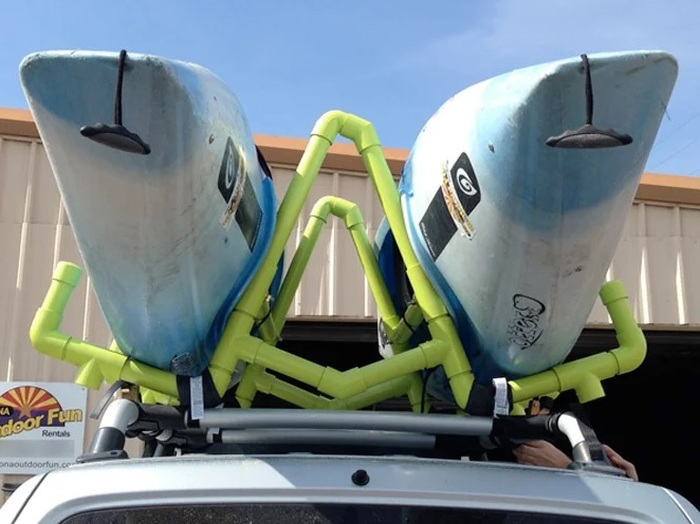
The two-kayak carrier is lightweight enough you’ll never struggle to attach it to your roof, and it’ll give you space to transport two kayaks or canoes, or four paddleboards.
You’ll find the materials are beautifully cheap and easy to assemble, and will be more than sturdy enough to last you for years of regular use.
20. Car Top Roof Rack
This Redditor has a fascinating plan for building a roof rack for his Honda Accord, though you can adapt it to fit pretty much any small car or van. It’s specifically designed to accommodate vehicles that don’t have crossbars or rails, meaning it can be used in literally any car, van, truck, or SUV.
It isn’t the most inexpensive rack on this list—you’ll need some specialized items that will be a little on the pricier side—but you’ll spend far less than if you paid for your vehicle’s manufacturer to install roof rails and a crossbar.
21. Truck Bed Kayak Rack
This kayak rack posted to Maker Forums is surprisingly easy to make, and can be a great option for using old scrap lumber you’ve got lying around your house or property.

You can load and unload it off the truck single-handed because of how light it is, but once it’s set up, you’ll love how sturdy and solid it feels.
The indoor/outdoor carpeting used to finalize the cradles is a nice touch that will protect your kayak from abrasion or dents while you’re driving it to and from the water.
Trailer Racks
22. DIY Kayak Trailer
This DIY kayak trailer is the brainchild of the good folks at Hiking Earth, and once you see the plans, I think you’ll agree that it’s a truly game-changing solution for transporting multiple kayaks without having to buy a huge, fancy trailer.

You don’t even need to use a trailer base to start with—you buy the wheels and frame separately, and assemble them all together using bolts to make a sturdy trailer.
Once the trailer is built, you can customize it however you want, adding on elements that suit your specific needs, whether you’ve got two kayaks or twelve.
23. No-Weld Kayak Trailer
If you’ve already got an old utility trailer just lying around your property (or you can find one cheap on Facebook Marketplace or Craigslist), this plan posted to Compact Camping Concepts will be the perfect step-by-step process for converting it into a kayak trailer you can tow to and from your favorite river, lake, or seashore.
It’ll cost you under $500 to build but will be as sturdy as any commercially-retailed trailer, and allow you to customize it the way you need it.
24. Removable Kayak Trailer Rack
This plan by Popo’s Woodworks is a great option for anyone who already has an existing trailer, and who wants to add a kayak rack that can be easily removed:
With this plan, you can add the rack when hauling kayaks, but remove it when you want to use the trailer to haul lumber, furniture, or other goods.
Best of all, the plan needs no welding, just the usual assortment of tools for cutting and assembling a lumber frame. All of the materials are also easily available in any hardware store and will cost a fraction of what you’d spend on a proper kayak trailer.
25. 6-Kayak Trailer Rack
The folks at the YouTube channel That Adventure Life have an awesome video on how to convert an existing utility trailer into a kayak trailer capable of holding up to 6 kayaks at a time:
You’ll need a trailer to build off of, but you’ll love that it’s fully removable so your trailer can still serve multiple purposes rather than being only a dedicated kayak trailer.
The video is easy to follow and will walk you through the process of building your own simple but sturdy kayak trailer rack.
Wall Racks
26. Simple Wooden Wall Rack
One Redditor found out the hard way about what happens if you go into a DIY project with no plan, but thankfully their lesson can be your gain. I strongly recommend that you scroll through the entire step-by-step process all the way to the end so you can learn what they did wrong, and how to avoid the simple mistake that set them back.
Once you finish it, you’ll see how easy the process actually is, and the end result is a 2-kayak rack that can be extended to fit up to 4 kayaks on a standard garage wall, and duplicated as many times as needed. It’s also a beautifully inexpensive and newbie-friendly wall rack to make.
27. $15 Wall Rack
Yes, you read that right: for just $15, you can make your own kayak wall rack, capable of holding kayaks up to 12 feet long.
Roman Castro posted the simple process to his YouTube channel, and as you’ll see by the video, it’s an incredibly simple design that can be replicated with only a few tools and minimal effort:
Once you understand the concept, it’s easy to modify it according to different kayak sizes, or if you want to add more storage space for paddles, paddleboards, and canoes.
28. Outdoor Kayak Wall Rack
This kayak rack designed by Fix It Scotty is crafted for outdoor use, meaning it’s built using sturdy materials that can withstand the elements, and uses special outdoor fastening hardware (screws and bolts) that won’t rust or snap in extreme heat or cold (like some indoor fastening hardware will):
The fact that it’s an outdoor design shouldn’t stop you from using it indoors—the rack will be just as solid inside your covered garage or walk-out basement as on the exterior wall of your home.
Though it’s only got space to store two kayaks, you’ll see by the plan that you can easily modify the dimensions to accommodate more ‘yaks as needed.
29. Ultra-Tough Wall Rack
For anyone who wants a kayak rack capable of standing up to A LOT of weight (for a fishing kayak, for example), this rack by Outdoorzone is definitely one to consider:
It’s made using 3/4″ schedule 40 pipe, the sort of steel piping used in water and gas lines, meaning it’s going to be ultra-tough and long-lasting. If you’re building it outdoors, you can use galvanized steel to ensure it doesn’t rust.
There are four videos in the series, with each one walking you through a different stage in the process (design, cutting, construction, etc.). Bear with it and watch all the way through to the end, and you’ll see that it’s one of the toughest DIY kayak racks around.
30. Wooden Kayak Wall Rack
The plans for this kayak rack are the creation of U Do It, and as you watch the YouTube video walkthrough, you’ll see just how beginner-friendly it is:
You’ll need very little in the way of tools, materials available everywhere, and only minimal know-how to get started. The details are all explained clearly enough that you’ll have no trouble assembling this wall kayak to hang as many kayaks as needed.
Conclusion
Building your own DIY kayak rack doesn’t have to be a costly, time-consuming, or complex task. Thanks to the plans above, you can put together a rack for your car, SUV, garage wall, trailer, or even a freestanding rack to hold your kayaks. Whatever your needs, there is an option above that can suit you!